Connect with us

Desktop Tools

Notepad++ : Best Lightweight Notepad Replacement


Advertisement

Notepad++ LogoNotepad in your Windows operating system is no doubt the simplest text editor to use but it’s too simple that it lacks many important features you see in some of the advanced text editors these days. For the sake of convenience you must look for a better replacement – a replacement which can offer more advanced functionalities over the current and too simple notepad.

Notepad++ is the perfect lightweight Notepad replacement , that won’t cost you anything. Notepad++ is a free open source text editor which also supports several programming languages under Windows environment. It’s also a perfect code editor as it supports syntax highlighting for many major programming languages including features like Line numbering.

I use Notepad++ almost every day for writing any text, memos, letters, maintaining my web sites, developing software in various languages etc.


The best thing about Notepad++ is its convenience which lets you open and edit multiple documents simultaneously in mult-tabbed environment. It is extremely easy to use and never gets into the way of what you are trying to do and saves you a lot of time.

Best Notepad Alternative - Notepad++

FEATURES

Some prominent features of Notepad++ :

  • Syntax Highlighting and Syntax Folding (for many popular programming languages)
  • WYSIWYG
  • User Defined Syntax Highlighting
  • Auto-completion
  • Multi-Document (You can edit several documents at the same time)
  • Multi-View (You have two views at same time. That means you can visualize (edit) 2 different documents at the same time. You can visualize (edit) in the 2 views one document at 2 different positions as well.)
  • Multi-tabbed view of a text editor

  • Fast Regular Expression Search/Replace supported
  • Full Drag ‘N’ Drop supported (Open any document by drag & drop)
  • Dynamic position of Views (You can set the position of the views dynamically)
  • File Status Auto-detection (After modification or deletion)
  • Zoom in and zoom out
  • Multi-Language environment supported
  • Bookmark (Ctrl+F2)
  • Brace and Indent guideline Highlighting (when the caret stay beside of one of those symbol { } [ ] ( ) , the symbol beside of caret and its symmetric opposite symbol will be highlighted, as well as the indent guideline (if any) in order to locate the block more easily)
  • Macro recording and playback

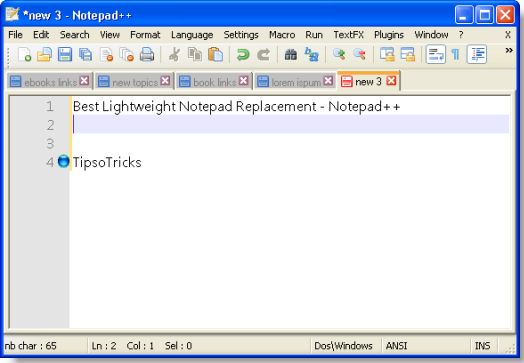
The interface is much simpler but equipped with hundreds of more advanced features. At top almost all basic functions are available with small buttons while the rest of the screen is made of nothing but pure white space with line numbers on the left. All the coding tools live in the menu bar, with some represented on the toolbar.

See all official screenshots here

WHY TO REPLACE SIMPLE NOTEPAD?

Switching to Notepad++ from built in Windows Notepad will depend on you that how much you use these advanced features of a text editor. Notepad++ installs separately and doesn’t automatically replace Windows Notepad. But if you want to replace completely, read the instructions given here.

One very useful feature of Notepad++ is that it remembers all the documents being edited in one session and suppose if you close the main Window (containing all the opened documents), Notepad ++ will remember all the documents previously opened, auto-updates them all and restores the complete session on the next launch.

There are literally so many features that can take a whole day if I start explaining each one by one. So I leave those all for you to explore.

So if you prefer the ability to open multiple documents, and you want all the advanced functionalities of a advanced text editor in one program, then I highly recommend Notepad ++. It’s a great alternative, and to some, an excellent notepad replacement.

DOWNLOAD

(filesize: 3.32 MB)

[Visit Official site]

Continue Reading
Advertisement
Comments

Desktop Tools

Smallest Antivirus to Automatically Remove Autorun.inf Virus from USB Flash Drives

Autorun.inf is not very harmful but still the most annoying virus of all which travels through flash drives. There’s a nifty tool designed specifically for this purpose – to remove Autorun.inf Virus from USB drive!

This virus automatically executes itself as soon as the infected flash drive is inserted into a system. When user double clicks the infected drive, autorun.inf with associated (hidden) .bat files infects all the partition of the system and autorun.inf is copied to all the drives.

Although this can be prevented through standard antivirus software but there’s a dedicated antivirus made specially to remove autorun viruses called Autorun Virus Remover.

Remove Autorun.inf Virus

Remove Autorun.inf Virus

Autorun Virus Remover provides protection against any malicious programs trying to attack via USB drive. When a USB device is inserted into your computer, Autorun Virus Remover will automatically scan it, block and delete autorun virus, trojans, and malicious code. Also, it can detect and remove USB virus such as autorun.inf virus in your computer.

Remove Autorun.inf Virus with Autorun Virus Remover can also remove the autorun virus due to which you can’t open your hard disk and USB drive (Pen drive, Memory card) by double clicking. Autorun Virus Remover USB antivirus software to permanently protect offline computer against any USB virus without the need for signature updates. This light and easy to use solution is compatible with all version of Windows and doesn’t slow down your computer at all.

Download Autorun Virus Remover

Continue Reading

Desktop Tools

Snappy: All in One Driver Installer For All Your System Drivers

snappy-driver-installer

Snappy system driver installer is a freeware for Windows which is an All in One Driver Installer and can be used as a complete solution to install all types of drivers on your system. There are two main sources which are supported by the program namely driver packs and local folders. The program is capable enough to pick the drivers automatically from the folder where you kept them and bring it to use at any given time.

snappy-driver-installer

The computers who have a weak or unreliable internet connection can avail the services of this program as it can install all the drivers without it. To start installing drivers on your computer, go to the updates option which can be found on the top and download the index file by checking on the option ‘Check only needed for this PC’ and then click on accept. This index file will add all the relevant information to the software. The program then works by checking for all the missing drivers and updates for the already-installed programs on the system.

You are also free to download all the driver packs, however, which is not recommended by the experts. You only need to do this if you need to create a completely portable version of a particular program on the computer which, by default, includes all the drivers. There is one thing to note that you will have to download nearly 9 GB of data in that case.

sdi

As soon as you are done downloading, the main interface of the program will show the updated driver information afterward. You can also enable the expert mode present on your left where you will be able to use filters to customize the selected option. You are also free to disable the updates which you think are, in no way, better than the ones already installed.

Before selecting the drivers which need to be updated, hover on each device to get information about each device’s already installed driver and the update the program wants to install. The information may consist of the update’s version, device’s manufacturer’s name, hardware IDs, etc. It is quite beneficial to give some time to these facts as there may be some updates which are not suitable for the device or are falsely identified. Once you are done with all these important steps, the Snappy Driver Installer will start downloading the selected driver updates for your system, installing afterward.

Continue Reading

Desktop Tools

Easiest Way to Recover Deleted Photos and Text Messages From Phone For FREE

Recover deleted photos from phone

Recover deleted photos from phone easily with the world’s number one android file recovery software named Wondershare Dr.Fone. It is a tool which is used worldwide for recovering files and data from android tablets and phones. The tool is capable of retrieving audio files, Whatsapp messages, videos, call history, contacts, photos, text messages and a lot more that you lost accidentally or due to the ROM flashing or OS crash. The tool supports about 200 android devices and many android versions.

Recover deleted photos from phone


How To Recover Deleted Photos From Phone And Other Data

Dr. Fone is very beneficial in recovering files on android devices and can retrieve deleted text messages too. However, if the tool is not dealt properly, the software will not be able to recover all the files properly. Before beginning the process of recovery, the following tips should be considered to increase the success rate positively.

  • First of all, if you find out that some of the files have gone missing on the phone or a list of data is deleted accidentally from the phone, stop using the device instantly. In android or other OS, the data is actually not blown away but is kept in the phone to be rewritten by some other files. For this particular reason, if the device is kept working on, that data gets overwritten by the recent changes in the phone and ultimately, disappears forever.
  • Secondly, look for a computer as soon as possible and start the process of recovery. Don’t forget, the sooner it is, the better it is. Download the recovery software by Wondershare i.e. Dr. Fone for android. For further information, follow the following downloading process.

How To Download

There are more than one way to download Wondershare on your phone. You can either go to the product page to find the app link or simply click the download option on the top of the page to get Dr.Fone on your phone. Once downloaded, your phone will offer an installation package. The download button is also featured in the bottom of the page.

How To Install

Once you have downloaded, search for the installation package on your system. Double tap on the .exe file to run the setup and click on the install option to start the recovery process. The installation process will take approximately a few minutes. Once there, the Start Now option should be clicked to launch the software.

Continue Reading

Trending