Blogging
Most Popular Widgets for Blogger Blog

Blogger widgets play really a very important role in giving a crispy professional look to your blog; such widgets are also helpful in increasing site’s visits and readers.
There are thousands of useful blogger-widgets/scripts available which can increase the attraction of your blog.
Some are just for fun, some are handy little gadgets, sometimes to show statistics of your blog, to show readers of your site, some are just for chat and communication, News widgets, Picture slideshow widgets… and many more like that. There are thousand types of widgets to choose from.
But here I’m to tell you some Most Basic and Must-have widgets for your blogspot blog, which you are supposed to install as soon as you create your blog.
Here I’m sharing some of the most popular and commonly used widgets used by almost all professional bloggers.
Note: Topics were getting messy as I have to put them all in one post. So I’ve made each topic expandable. So, you can expand/collapse the topics by clicking on the headings.
Must Have Widgets
1. Recent Posts
To Install this widget you must first install RSS feeds to your blog.(What is RSS feed?) I prefer Feed Burner for RSS feeds. After installing RSS feed If you have installed a third-party theme to your blog, then your layout may be divided into proper sections, and it is possible that you may find “Recent Post” widget already installed.
If it is there already then you just have to click “edit” link on the gadget. Then ignore next two steps & jump to step #4.
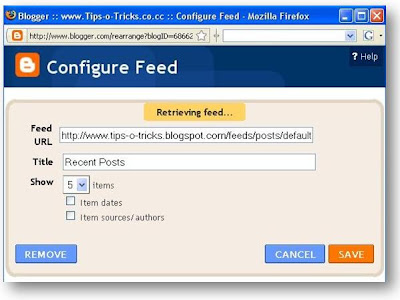
2. Choose the section where you want to show “Recent Post” widget and then click “Add a Gadget” link. 3. From the pop up window that opens, scroll down in the middle and click “Feeds”. Another window will pop-up.
4. In the “Feed URL” text box, copy/paste this link:
http://www.YOUR-BLOG-NAME.blogspot.com/feeds/posts/default 5. Give any “Title” you want to this widget, like “Recent Posts”.
6. Choose Number of Posts to show from the drop-down box. (You can select max. 5 posts to show).
7. “Item date” & “Item sources” are optional. You can select them to show Date of the post with author’s name. 8. Click Save.
After few moments, it’ll show you the list of recent posts of your blog on the same pop-up screen. If it doesn’t then re-check the Feed URL you inserted for errors. If you are using “Expandable Post Summaries” in your site, and your home page shows minimum 5 posts, then I recommend not to use this “Recent Post” widget, there will be no use of this widget as it’ll be waste of space on your home page.
This widget, no doubt is the most important of all, as it shows all your recent posts of your blog.
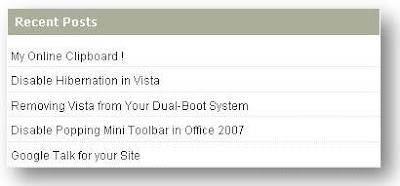
If you usually write long articles to your blog and you like to show fewer of them on the home page. In that case your past posts hide away. Then this widget helps you there, as the reader can see your previous posts through this widget. Thus “Recent Post” widget plays an important role in increasing the interest of the readers.
Setting up an RSS feed on your blog makes it easy for your readers to not just read your blog through there favorite RSS reader but also know when you publish new content.
——-Click here to learn how to add RSS Feeds to your blog———–
[+/-] Click to see the Installation instructions:
1. Go to ‘Layout” of your blog.

….replacing “YOUR-BLOG-NAME” with your actual blog’s address. If you own a domain then remove ” .blogspot” too and replace it with your domain’s extension.
If your blog is newly created and you haven’t posted anything yet, then this can be the second reason to not showing any post.
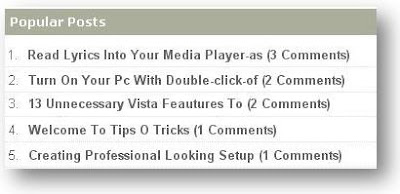
2. Popular Posts
Another window will pop-up. 5. In the content Area, Copy/Paste this code below: ………..replace YOUR_BLOG_ADDRESS_WITHOUT_http:// with your blog’s actual complete address.
6. Click Save and Preview. If you are submitting your site to postrank first time, then it’ll tell you that “We haven’t seen your site before”. 3. Click the link given in the email to see your site’s feed indexed by postrank.
4. Now after checking your feed, Come back here at this page and click this link:
http://www.postrank.com/publishers/customize
Follow the steps given in that page, customize and create your “Top Post” widget. Or if you choose to manually install the widget, you have to copy the code given at bottom of that page and follow these steps to manually install the widget: 1. Go to ‘Layout” of your blog. 5. In the content Area, Paste the code you received from postrank.com feeds.
Unlike the Recent Post widget, this widget shows your most popular posts in terms of:
I. Number of Comments
If you install this widget, then the posts (max. 5) with the most number of comments by readers will be shown by this widget.
[+/-] Click to see the Installation Instructions:
1. Go to ‘Layout” of your blog.
2. Choose the section where you want to show “Popular Post” widget and then Click “Add a Gadget” link.
3. From the pop up window that opens, scroll down in the middle and click “HTML/JavaScript”.


4. Give any title, like “Popular Post” or “Most Commented Posts”.
<script type="text/javascript">

function pipeCallback(obj) {

document.write('<ul style="text-transform: capitalize;">');

var i;

for (i = 0; i < obj.count ; i  )

{

var href = "'"   obj.value.items[i].link   "'";

var item = "<li>"   "<a href="   href   ">"   obj.value.items[i].title   "</a> </li>";

document.write(item);

}

document.write('</ul>');

}

</script>

<script src="https://pipes.yahoo.com/pipes/pipe.run?_render=json&_callback=pipeCallback&_id=28a6afad7c6ba1288c1b738277e42385&url=http%3A%2F%2FYOUR_BLOG_ADDRESS_WITHOUT_http://&num=10" type="text/javascript"></script>
7. If it looks good, Click “Save”.
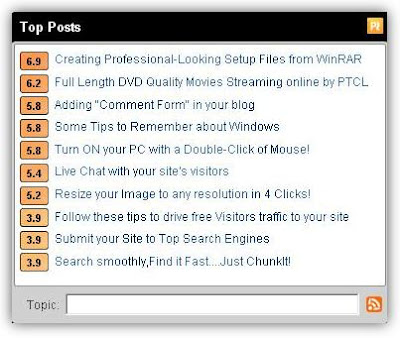
This widget will also show all popular posts but on the basis of most number of hits on that topics.
[+/-] Click to see the Installation Instructions:
To install this widget, you first have to visit PostRank.com
1. Then Insert address of your blog/site in the text box on top of the page
2. Click Analyze.
Now you leave your email address there, so that they can email you as soon as they index your site’s feed.
It usually takes a day to their email to arrive in your inbox.
You can use “Quick Install” to install the widget you’ve customized, directly to your blog (step 3 given on that page) .
2. Choose the section where you want to show “Popular Post” widget and then Click “Add a Gadget” link.
3. From the pop up window that opens, scroll down in the middle and click “HTML/JavaScript”.
Another window will pop-up.
4. Leave the title section blank, as “Top Post” is already written on the widget by Postrank.
6. Click Save and then Preview your blog.
7. If everything went good, Click “Save”.
3. Related Posts
This widgets really helps you in keeping the visitor’s interest in your blog. Reader finds this widgets as soon as he reaches the end of an article. 2. Check “Expand Widget Templates” checkbox. Now, just BEFORE this tag paste all the code below:
After pasting this…Now, search for this line of code: <data:post.body/> And AFTER this, paste the code below: .. you can customize the heading, by changing the text in red.
3. “Preview” the template first, DON’T save at this point. If Preview window shows your blog fine and with the “Related Posts” widget after every post, then it means, everything went perfect. Otherwise it’ll show an error, and prompt you to remove it first before saving. Common mistakes we do is incomplete Copying/Pasting the code. Make sure you copied everything carefully and pasted it in right places, defined above.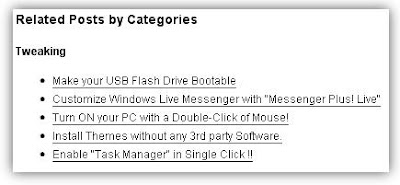 Related posts widgets shows all the posts related to the article currently being read. It actually fetches and shows all other posts with the same label with which current post has been labeled. [+/-] Click to see the Installation Instructions: 1. Go to ‘Layout” of your blog, and then “Edit HTML” tab.
Next step should always be backing up your blogger template, so than if anything goes wrong, you’ll have your backup to restore to original condition. So, click “Download Full Template” link to first download backup! 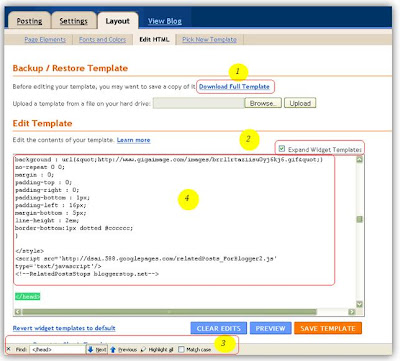
Now find (Ctrl+F) this tag: </head>
<!--Related Posts Scripts and Styles Start--> <style> #related-posts { float : left; width : 540px; margin-top:20px; margin-left : 5px; margin-bottom:20px; font : 11px Verdana; margin-bottom:10px; } #related-posts .widget { list-style-type : none; margin : 5px 0 5px 0; padding : 0; } #related-posts .widget h2, #related-posts h2 { font-size : 20px; font-weight : normal; margin : 5px 7px 0; padding : 0 0 5px; } #related-posts a { text-decoration : none; } #related-posts a:hover { text-decoration : none; } #related-posts ul { border : medium none; margin : 10px; padding : 0; } #related-posts ul li { display : block; background : url("http://2.bp.blogspot.com/_u4gySN2ZgqE/SnZhv_C6bTI/AAAAAAAAAl4/Rozt7UhvgOo/s200/greentickbullet.png") no-repeat 0 0; margin : 0; padding-top : 0; padding-right : 0; padding-bottom : 1px; padding-left : 21px; margin-bottom : 5px; line-height : 2em; border-bottom:1px dotted #cccccc; } </style> <script src='https://bloggerhosting.appspot.com/serve/zainali88.googlepages.com/Related_posts_hack.js' type='text/javascript'/>

<!--Related posts--> <b:if cond='data:blog.pageType == "item"'> <div id='related-posts'> <font face='Arial' size='3'><b>Related Articles: </b></font><font color='#ffffff'><b:loop values='data:post.labels' var='label'><data:label.name/><b:if cond='data:label.isLast != "true"'>,</b:if><b:if cond='data:blog.pageType == "item"'> <script expr:src='"/feeds/posts/default/-/" data:label.name "?alt=json-in-script&callback=related_results_labels&max-results=10"' type='text/javascript'/></b:if></b:loop> </font> <script type='text/javascript'> removeRelatedDuplicates(); printRelatedLabels(); </script> </div></b:if> <!--Related posts ends-->
4. If preview shows everything fine, then you can SAVE the template 🙂
4. Recent Comments
This widget helps you to show most recent comments (max. 5) given by visitors to any topic of your blog. 1. Go to ‘Layout” of your blog. If you have installed a third-party theme to your blog, then your layout may be divided into proper sections, and it is possible that you may find “Recent Comments” widget already installed. If it is there already then you just have to click “edit” link on the gadget. Then ignore next two steps & jump to step #4.
2. Choose the section where you want to show “Recent Comments” widget and then click “Add a Gadget” link. 3. From the pop up window that opens, scroll down in the middle and click “Feeds”. Another window will pop-up.
4. In the “Feed URL” text box, copy/paste this link: http://www.YOUR-BLOG-NAME.blogspot.com/feeds/comments/default ….replacing “YOUR-BLOG-NAME” with your actual blog’s address. If you own a domain then remove ” .blogspot” too and replace it with your domain’s extension.
5. Give any “Title” you want to this widget, like “Recent Comments” or “Top Commentators”.
6. Choose Number of Posts to show from the drop-down box. ( you can select max. 5 posts to show).
7. “Item date” & “Item sources” are optional. You can select them to show Date of the post with author’s name. 8. Click Save.
9. Now click “Preview”, If everything went good, Click “Save”. After few moments, it’ll show you the list of recent comments given to your blog on the same pop-up screen. If it doesn’t, then re-check the Feed URL you inserted for errors. If your blog is newly created and you haven’t received any comments yet, then this can be the second reason to not showing any post. 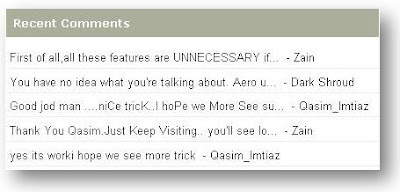 To install this widget, your blog must have RSS feeds installed. If you are already using “Recent Post Widget” then you must have RSS feeds associated. So there is no need to register for RSS feeds again. [+/-] Click to see the Installation Instructions:
5. Top Commentators
“Top Commentators” Widget enables you to display the names of the top ten people who comment on your blog. [+/-] Click to see the Installation Instructions: 2. Choose the section where you want to show “Top Commentators/Recent Comments” widget and then click “Add a Gadget” link.
3. From the pop up window that opens, scroll down in the middle and click “HTML/JavaScript”. Another window will pop-up. 4. Give any title, like “Top Commentators” or “Active Readers”. 5. In the content Area, Copy/Paste this code below: ………..replace YOUR-BLOG-ADDRESS with your blog’s actual address. If you own a domain then remove “ .blogspot” too and replace it with your domain’s extension. If you do not want to show your own name in commentators list, then replace XXXX with your name. This will filter your name, and won’t show your name among Top Commentators.
6. Click Save and then Preview from the layout window.
7. If everything went good, Click “Save”.  This can be installed just to encourage your site’s readers to read and comment more.
<script type="text/javascript"> function pipeCallback(obj) { document.write('<ol>'); var i; for (i = 0; i < obj.count ; i ) { var href = "'" obj.value.items[i].link "'"; if(obj.value.items[i].link == "") var item ="<li>" obj.value.items[i].title "</li>"; else var item = "<li>" "<a href=" href ">" obj.value.items[i].title "</a> </li>"; document.write(item); } document.write('</ol>'); } </script> <script src="https://pipes.yahoo.com/pipes/pipe.run?_render=json&_callback=pipeCallback&_id=2f414149ab66e0892a6a179016f93019&url=http%3A%2F%2Fwww.YOUR-BLOG-ADDRESS.blogspot.com&num=10&filter=Naser" type="text/javascript"></script>
6. Contact us
In most of the blogs you’ll find “Contact us” missing!! This is a great negative point for that site/blog. This makes your blog more “non professional”. Think that this is the only way your readers/commentators/sponsors can contact you. If you just put your email address exposed on your site, this makes your email inbox vulnerable to spam!! So inserting a “contact us” page/link/widget in your site keep you protected from unwanted junk emails. Unfortunately, blogger.com doesn’t offer anything like this. So we have to go and search for some other free services to do this for us. ![]() Luckily, Kontactr provides us free, great and probably the easiest way to use Contact-Form Service. All you need to do is sign up for a free account and anyone who wants to contact you, will be able to email you directly from your site.
Luckily, Kontactr provides us free, great and probably the easiest way to use Contact-Form Service. All you need to do is sign up for a free account and anyone who wants to contact you, will be able to email you directly from your site. 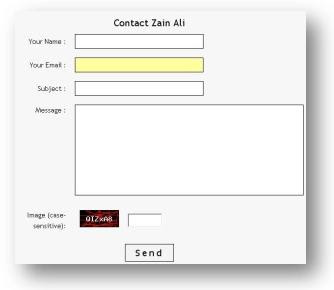 So…give it a try. You can Contact me??.. 😉
Optional Widgets
1. Live Traffic
Live traffic widget helps you to recognize that which one of your topics of your blog are getting popular, from which country people are coming the most and from which site they are coming or which search engine is helping you to driving traffic to your blog.
Its function is just to show you these stats; it actually doesn’t help you to increase traffic to your blog.
Again blogger.com doesn’t have any widget like this but there are many other free services you can use. Feedjit.com
 This widget shows that, WHO, FROM WHERE coming on your site and ON WHICH TOPIC!!
Like;
Wowzio.com
2. Web Counter
These are some of the most popular FREE Counter services: FreeCounterCode.com No Email address is required to signup; you just have to insert your site’s URL, choose a counter and copy/paste the given code in your site. 2. Click any “Add a Gadget” link.
3. From the pop up window that opens, scroll down in the middle and click “HTML/JavaScript”. 5. In the content Area, Copy/Paste the code given by the web counter’s site.
6. Click Save. 7. Now drag this newly created widget and drop it below the footer gadget of the layout.
This will show the counter inside the footer of your blog.
8. Now Click “Preview”, if everything’s is alright then Click “Save”.
Ever wonder how many visitors do you get to your site?
Everyone likes to know how much traffic makes its way to their website. You can see this by inserting a small “counter” widget in your blog.
This works just like a simple counter, “one visitor visit – one increment in counter”
EasyCounter.com
FreeHitsCounter.org
[+/-] Click to see the Installations Instructions:
1. Go to ‘Layout” of your blog.
Another window will pop-up.
4. Don’t give any title! Leave it Blank.
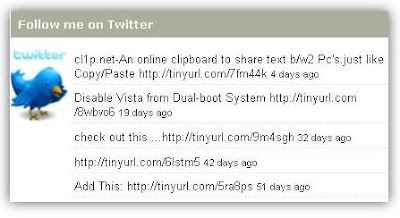
3. Twitter Updates
2. Choose the section where you want to show “Twitter Updates” widget and then click “Add a Gadget” link.
3. From the pop up window that opens, scroll down in the middle and click “HTML/JavaScript”. 5. In the content Area, Copy/Paste this code below: ………..replace YOUR-USER-NAME with your twitter username. 6. Click Save and then Preview from the layout window.
7. If its fine, then Click “Save”.
If you are a “twitter” user, and want to show your twitter updates on your blog/site…then this widget is just for you!
[+/-] Click to see the Installation Instructions:
1. Go to ‘Layout” of your blog.
Another window will pop-up.
4. Give any title, like “My Twitter Updates”.
<div id="twitter_div" style="background: url(https://img385.imageshack.us/img385/9364/logotwittergl9.jpg) top left no-repeat; padding-left: 60px;">

<ul id="twitter_update_list"></ul></div>

<script src="https://twitter.com/javascripts/blogger.js" type="text/javascript"></script>

<script src="https://twitter.com/statuses/user_timeline/YOUR-USER-NAME.json?callback=twitterCallback2&count=5" type="text/javascript"></script>
Above code will show latest 5 updates of your twitter account, If you want to increase this number than change 5 (in blue) to the number you want.
4. My Social Sites
In this widget I’ve embedded my twitter, orkut, digg and stumbleupon profile links. 2. Choose the section where you want to show this widget and then click “Add a Gadget” link.
3. From the pop up window that opens, scroll down in the middle and click “HTML/JavaScript”. 4. Give any title, like “Follow me on these sites” or “Sites I use” :p…or whatever you like.. 😀 ………..replace colored text with your respective ID’s on these sites.
6. Click Save. 7. Now Click “Preview”, after previewing if there’s no error Click “Save”.
![]() If you want the readers to visit and follow your profile on various social sites, you can install this widget.This widget shows the links to your profile on some of your favorite social sites with their respective logos.
If you want the readers to visit and follow your profile on various social sites, you can install this widget.This widget shows the links to your profile on some of your favorite social sites with their respective logos.
If you know little bit of HTML than you can customize it the you want it, and can add as many site’s links as you want.
[+/-] Click to see the Installation Instructions:
1. Go to ‘Layout” of your blog.
Another window will pop-up.
5. In the content Area, Copy/Paste the code below:
<!--Social sites links by Zain-->

<center>

<a target="_blank" href="http://www.twitter.com/YOUR-TWITTER-USER-NAME">

<img src="https://img178.imageshack.us/img178/8742/twitterlogoik7.jpg"></a>

<br/><br/>

<a target="_blank" href="YOUR-COMPLETE-ORKUT-PROFILE-LINK">

<img src="https://img231.imageshack.us/img231/1672/logoorkutpj3.gif"></a>

<br/><br/>

<a target="_blank" href="http://digg.com/users/YOUR-DIGG-USER-NAME">

<img src="https://img515.imageshack.us/img515/3858/digglogour9.gif" ></a>

<br/><br/>

<a target="_blank" href="http://YOUR-STUMBLEUPON-USER-NAME.stumbleupon.com">

<img src="https://img135.imageshack.us/img135/4009/stumbleuponlogowr3.jpg"></a>

</center>
5. Chat Box
ShoutMix But Yahoo! has offered its new service of inserting Yahoo! Ping Box messenger in your blog, using which, your visitors’ chat with you live on your Yahoo! Messenger.
If you want your readers to contact immediately via chat on your site, then these chat box widgets will help you in this.
CBox

But draw back of these chat boxes is that you have to keep open your blog and refresh the page after every message to chat with visitors.
This means messages sent by Yahoo! Ping box will be received on your Yahoo! messenger on your desktop… 🙂
I’ve already written a post about this Yahoo! Pingbox.. Read it here to learn how to install and use.
6. Blog Statistics
2. Choose the section where you want to show “Blog’s Statistics” widget and then click “Add a Gadget” link.
3. From the pop up window that opens, scroll down in the middle and click “HTML/JavaScript”. 4. Give any title, like “Blog’s Stats”. ………..replace both “YOUR-BLOG-NAME” with your blog’s actual address. If you own a domain then remove ” .blogspot” too and replace it with your domain’s extension.
6. Click Save.
7. Now Click “Preview”, after previewing if there’s no error Click “Save”.
This little widget takes very little space and shows your blog’s total number of posts and total number of comments.

[+/-] Click to see the Installation Instructions:
1. Go to ‘Layout” of your blog.
Another window will pop-up.
5. In the content Area, Copy/Paste the code below:
<script style="text/javascript">

function numberOfPosts(json) {

document.write('Total Posts: <b>'   json.feed.openSearch$totalResults.$t   '</b><br>');

}

function numberOfComments(json) {

document.write('Total Comments: <b>'   json.feed.openSearch$totalResults.$t   '</b><br>');

}

</script>

<ul><li><script src="https://YOUR-BLOG-NAME.blogspot.com/feeds/posts/default?alt=json-in-script&callback=numberOfPosts"></script></li>

<li><script src="https://YOUR-BLOG-NAME.blogspot.com/feeds/comments/default?alt=json-in-script&callback=numberOfComments"></script></li></ul>
If you are facing any kind of problem installing these widgets, tell me!
AAANDDD … last but not least, if you like this post and learned a little bit from it, then DON’T forget to share this with others. I’ve put a lot of effort in collecting these.


Best Generative AI Chatbot Comparison: ChatGPT vs Gemini vs Copilot vs Claude
Explore the pinnacle of conversational AI as we compare leading platforms: ChatGPC, Gemini, Copilot, and Claude for the title of...


Top 5 Disposable Email Generators for Secure Temporary Use
Discover the best disposable email generators for safe, temporary email solutions. Ideal for quick use without compromising privacy.


The Best Methods To Transfer Data From Android To iPhone
Switching from an Android phone to an iPhone can be an exciting but overwhelming experience, especially when you want to...


Get FREE US Virtual Bank Account Number To Receive Payments Online
Getting a virtual account number is the unique need of those freelancers and other online earners who work prolifically on...


Make Perfect Visual Identities On Mobile With Logo Maker App!
Are you amid those who are looking for a perfect logo creator? Be glad! Logo Maker App has heard you. You...