Blogging
How to Add Custom Domain Name (.com) to Your Blogspot/Blogger Blog
By default all new blogs at Blogger.com comes with .blogspot extension in their names. They work and look fine but mostly considered as non professional to some readers. Adding a Custom domain to your .blogspot blog not only creates a good impression over visitor but also generate a formal and positive impression of your blog in blogosphere.
Adding custom domain in your blog’s url only remove ‘.blogspot’ part from your blog’s address and your blogger/blogspot blog’s address you will change to something like http://www.yourblog.com.
If you buy and add a custom domain to your blog, your Blog will still be hosted on (free) blogger.com hosting. The only change is your blog’s address your posts will be there but displayed at your new address.
To convert your .blogspot/blogger blog to a new (.com/.net/.org) domain name, follow simple steps below, divided into 3 parts.
Part 1 – Buying a Domain
1. Buy a domain name.
Sites that offer domain registration services are called “Domain Registrars”. You can use any registrar that you trust or seek recommendations from your friends having their own domain names.
TLD (Top Level Domain) includes: .com , .net , .biz, .info , .org, .mobi etc
2. To buy a domain, go to any domain registrar site that you selected after recommendation or personal research & comparison.
See list of top domain registrars or complete list of all international domain registrars.
2. Search for the domain name that you want to register and follow the simple proceeding steps for payment.
Prices range anywhere from $7-$10 and all of the sites offer payment through credit card and paypal.
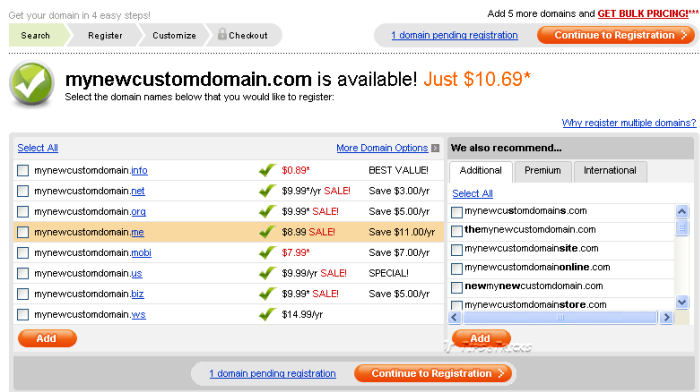
3. Carefully enter your domain name and double check the name and spelling before payment.
4. Wait for the registration confirmation email from your registrar with username and password in the email.
Part 2 – Configuring DNS Settings
DNS (Domain Name System), and a DNS server determines what site a given address takes you to. So far, you have a domain name but none of the servers on the internet know what to do with it yet.
1. Sign in to you domain registrar’s site, using username and password (given in the confirmation email).
2. In the Domain control panel click the domain name to enter its settings page.
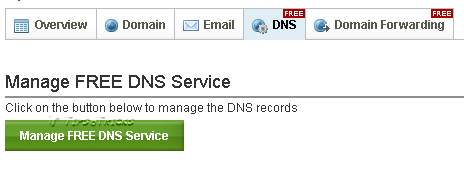
3. Find for “DNS” / “DNS Settings”/ “Total DNS” / “DNS Management” in your domain control panel and click it.
3. Find CNAME and add a new CNAME
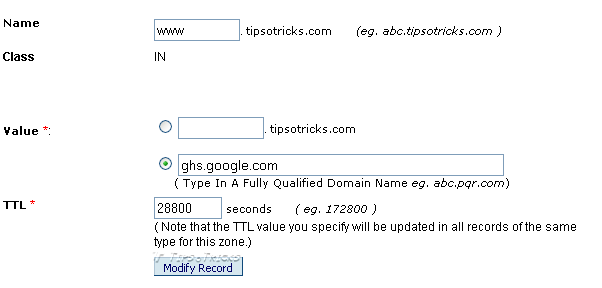
You’ll find three entry boxes under CNAME:
1. Name (Alias or Record Name)
2. Value (or Record Value)
3. TTL
Your domain control panel may call “Name” and “Value” with some other labels.
In Name/Alias, type: www

In Value, type: ghs.google.com

In TTL, type: 1800 (or leave the default value if already written)
4. Now find ‘A’NAME and a new ‘A’NAME or ‘ARecord’.
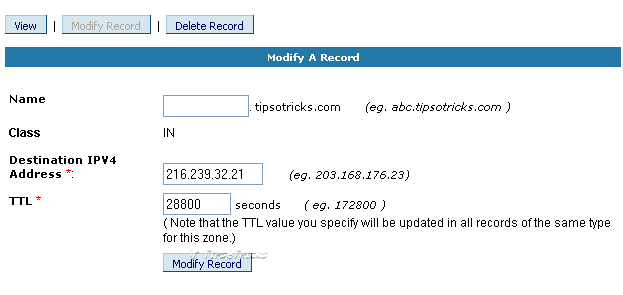
Again you’ll find same three text boxes;
1. Name (Alias or Record Name)
2. Value (or Record Value or IP address)
3. TTL
Your domain control panel may call “Name” and “Value” with some other labels.
Leave the Name field blank this time.

In Value/IP address, type:  216.239.32.21

In TTL, type: 1800 (or leave the default value if already written)
After entering above information in your DNS settings, Save your settings and you may log out from your domain control panel now.
This tells your DNS (domain) where to direct your new domain address. Wait for 24-48 hours until your Domain is configured and start directing to Google’s (Blogger) server.
Part 3 – Introducing newly configured domain to your .blogspot blog
After waiting (for 24-48 hours) move to your blog, where you configure your .blogspot blog to direct to your new domain name.
1. Sign in to your blogger account.
2. Go to “Publishing” tab under “Settings” page.
3. Click on “Custom Domain”
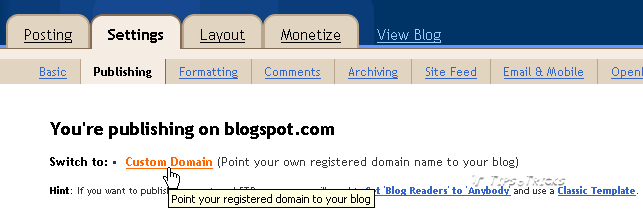
4. Click “Switch to Advanced Settings”

5. Enter you domain name (including http://www)
6. After Word Verification Click “Save Settings”.
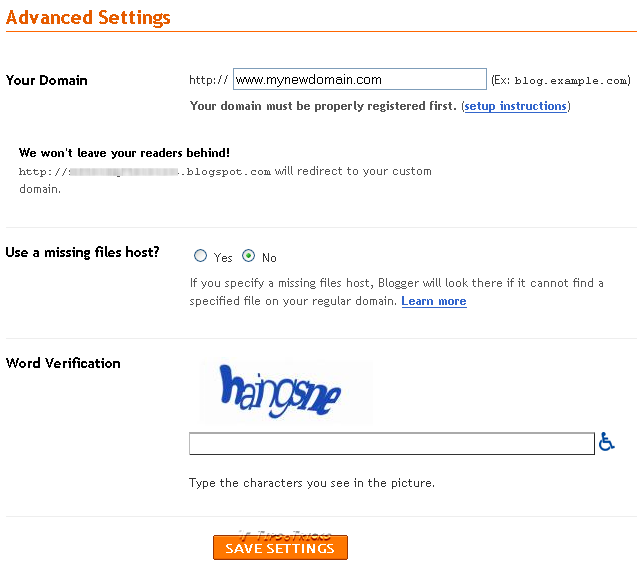
After settings are successfully saved you’ll see a checkbox under “Your Domain” textbox.
7. Tick mark the checkbox saying “Redirect mynewdomain.com to www.mynewdomain.com”
This will redirect the user to your new domain even if someone enters your blog’s URL without ‘www’
8. Enter word verification and Save Settings again.
9. View your blog and see the URL with new domain name.
If concept and procedure of adding custom domain is still confusing just think of a bridge connecting two edges. Here your new domain name is one end and your blog is the other end and you need to create a bridge between these two ends. Your newly bought domain doesn’t know where to direct itself an
d on the other end is your blog – which doesn’t know which domain name in this world is being configured for it.
Settings in part 2 and 3 is to create that bridge between your domain name and your blog.
Things to Remember
– Everything including your Posts, images, widgets, backlinks, Visitors’ comments, RSS feed, Feed subscribers will be unaffected and remain there. (Even your RSS Feeds’ URL will be same)
– You won’t loose your previous posts’ links and images as Blogger’s service automatically redirects your old .blogspot URL to your new (.com/.net) address.
Like, if somebody enters link to any of your posts, say;
http://www.myownblog.blogspot.com/hello-there.html
…it’ll be redirected to new address automatically.
http://www.myownblog.com/hello-there.html
– Your Search engine rankings won’t be effected but you WILL loose your page rank.
– It is highly recommended to re-submit your (new domain) Blog’s sitemap to Search Engines.
Hope you got all above steps. So if you are planning to buy a new domain for your blog or if you have bought but facing any problem in configuration, leave your queries/comments. I’ll try my best to assist you.


Best Generative AI Chatbot Comparison: ChatGPT vs Gemini vs Copilot vs Claude
Explore the pinnacle of conversational AI as we compare leading platforms: ChatGPC, Gemini, Copilot, and Claude for the title of...


Top 5 Disposable Email Generators for Secure Temporary Use
Discover the best disposable email generators for safe, temporary email solutions. Ideal for quick use without compromising privacy.


The Best Methods To Transfer Data From Android To iPhone
Switching from an Android phone to an iPhone can be an exciting but overwhelming experience, especially when you want to...


Get FREE US Virtual Bank Account Number To Receive Payments Online
Getting a virtual account number is the unique need of those freelancers and other online earners who work prolifically on...


Make Perfect Visual Identities On Mobile With Logo Maker App!
Are you amid those who are looking for a perfect logo creator? Be glad! Logo Maker App has heard you. You...