Desktop Tools
Forget Default Windows Files Search, Try “Everything”- Fastest Desktop Searching Engine
If you frequently search files and folders in your windows powered PC, then you must know the step by step process 😉
If you are XP user, you open the windows explorer, click search button, An annoying little animated character shows up asking “what do you want to search”, you select the required option, then type in the file name,hit the search button again.
Even if you have the Fastest PC of all, it takes a while to retrieve the files you search for!!
No doubt Its bit quicker in Windows Vista & onwards, but still, it takes few seconds!
But Now I’ve found “Everything”. A fantastic little searching utility to help you search the files or folders,as you type,with a single click, right from your desktop !!
Everything is a Freeware Desktop Searching utility, that locates files and folders by filenames instantly for Windows PC. But Believe me I’ve used them all, and found none of them as impressive as “Everything”.
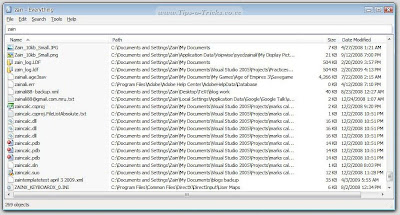
In “Features List” of above mentioned desktop searching tools,you will see everything except their “Indexing time” (the time they take to index all the files/folders of your system). But believe it or not, “Everything” indexes all your file/folders as soon as you open it! Take a look at the size of its database file, it created on my PC. If you dont want the search results to be applied on the hidden or system files, simply goto the options>Exclude and Check the options to your needs. You can also use Wild cards, just like in traditional windows searching.
Ok! Check out the complete FAQ Section of Everything’s Webpage, you will find lots of useful info about it.
After using and observing the features, I concluded these results: Positives: Negatives: If your search results is showing nothing or excluding files of any of your partitions, then it means your whole hard drive or a specific partition is not on NTFS. 1. Click Start, Click RUN, type cmd, press OK. 2. At the command prompt, type the following, where drive letter is the drive that you want to convert: For example, type the following command to convert drive E to NTFS:
convert e: /fs:ntfs
Note: If the operating system is on the drive that you are converting, you will be prompted to schedule the task when you restart the computer because the conversion cannot be completed while the operating system is running. When you are prompted, click YES.
3. When you receive the following message at the command prompt, type the volume label of the drive that you are converting, and then press ENTER: The type of the file system is FAT. 4. When the conversion to NTFS is complete, you re 5. Quit the command prompt.
Thats it!.. from now on, files on newly converted partition(s) will also be included in search results.
(Filesize: 334kb) I’d recommend this to all of the Windows users, even if they are using Windows Vista or 7. So! Spread the word, Share it with your friends ! 😉 Have a good day.
Unlike Windows search “Everything” displays every file and folder on your computer.
Yes, there are dozens of searching softwares available on net.
Like;
Google Desktop search.
Microsoft’s Windows Search (For Windows XP and earlier)
Copernic Desktop Search.
…and lot of others like these.
Let me tell you… they take several hours and even days, depending on the numbers of files and size of hard drive.
Yes It shocked me too!
It took about 6-8 seconds to index my 80 GB hard drive 😀
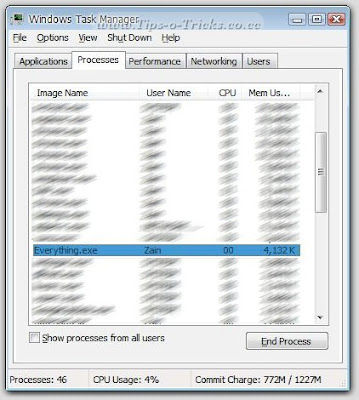
This tiny desktop searcher takes very few space in memory.
In my 80 GB case,Its taking just 4MB! 😉
After quick indexing, it places itself in taskbar from where it can be accessed with a double click.
And shows ALL of the files and folders on the main window, including the system files and the hidden files.
User defined files/folder can also be added to the exclusion list.
– Instant Single Click Searching.
– Very Low on Resources.
– Searches real time the files changing.
– Updates its database on every system restart.
– Supports all Windows Version, including Windows 7.
– Searching possible on Remote Systems.
– Unlike Google Desktop Search, it Searches only Files names, not the content of the files.
– Works only on NTFS Drives.
But Dont worry! you can change the file system to NTFS, without the loss of data with a simple command.
[+/-] Click Here to see how to do it.
To convert an existing FAT or FAT32 volume to NTFS, follow these steps:
convert drive letter: /fs:ntfs
Enter the current volume label for drive drive letter:
ceive the following message at the command prompt:
Conversion complete
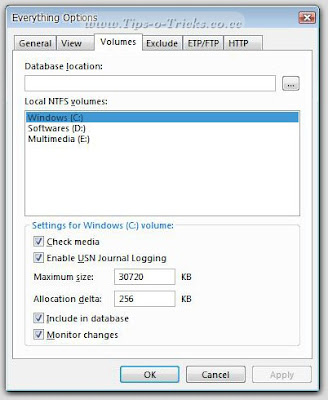
After conversion to NTFS, you will have to manually include that partition(s) to “Everything’s” database.
Goto Options>Volumes>
Select the drive(s) that is recently converted to NTFS
and Check “Check media” & “Enable USN Journal Logging” check boxes.
Visit Author’s site
I am using it, and very satisfied the with its performance. 😉
They will definitely love it!


