Desktop Tools
Best 7 Ways to Make Your Firefox Lighting Fast
Despite the fact that Firefox is #1 Web Browser, still it remains resource hungry even after so many releases and improvements. Even with a fewer tabs opened you’ll notice quarter of your RAM used and/or high CPU usage even when left idle. And this is because of behind the scene addons, plugins and extensions installed in Firefox that keep it busy. Here are 7 tips that I found and applied successfully that can increase the speed of your Firefox to make a better browsing experience.

1. Use RSS Reader, Avoid Live Bookmarks
The most important tip to speed up Firefox is to avoid using or subscribing through Live Bookmarks of Firefox. Firefox checks its Live Bookmarks every hour for updates so if you’re subscribed to RSS Feeds through Live Bookmarks you will definitely feel slow performance while browsing.

Always use a dedicated RSS Reader like (online) Google Reader or any dekstop RSS Reader you like. Delete the preset Latest Headlines Live Bookmark from the toolbar too.
2. Disable Automatic Updates
Firefox constantly checks for the latest releases. Most of the people think that this is not really important to speed Firefox up. But if you’re not that “I like to keep myself updated” type geek then you can disable automatic update check and manually check for updates as long as you’re happy with the current version or whenever you feel that your current version is lacking support for any addon.
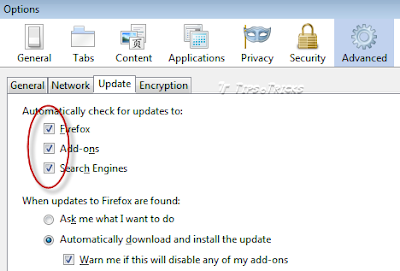
To disable automatic update check goto Options > Advance > Update and uncheck all 3 check boxes.
3. Install Download Manager for Firefox
You can speed up files downloading in firefox by installing small addon called, DownloadThemAll.
DownloadThemAll is all you can desire from a download manager: it features an advanced accelerator that increases speed up to 400% and it allows you to pause and resume downloads at any time.

It is a fast, reliable and easy-to-use! It lets you download all the links or images contained in a webpage and much more: you can refine your downloads by fully customizable criteria to get only what you really want!
4. Install FasterFox – Addon to tweak Firefox’s Advanced Speed Settings
Fasterfox Lite allows you to easily tweak many network and rendering settings such as simultaneous connections, pipelining, cache and initial paint delay. It has options for SSL Pipelining, timer-based content reflows, UI Responsiveness, Link Prefetching, IPv6 DNS lookups, and by default the Page Load Timer is disabled.

If you want to manually change the “about:config” settings, then the Fasterfox Lite preset must first be saved to the “Custom” setting. This is to prevent the configurations from being different from a selected preset settings.
5. Basic but Manual Speed Tweaks
If you don’t want to install any addon to tweak default settings, then you may try these some most common tweaks to speed up the browsing experience.
Remember! If you’re going to ue Faster Fox then do not apply these manual settings.
1. Type “about:config” into the address bar, press enter and press “I’ll be careful, I promise!” button.
2. Now from the list look for “network.http.pipelining”. If it’s false, double-click that line to change it to true.

If you use broadband, you can make webpages load even faster in Firefox by using this “pipelining” trick. Normally the browser will make one request to a web page at a time. When you enable pipelining it will make several at once, which can speed up page loading.
3. Set “network.http.proxy.pipelining” to true also by double-clicking it.
4. Set “network.http.pipelining.maxrequests” to 8 by double-clicking it. This means it will make 8 requests at once. There is no point setting it higher then 8 as it is capped at 8 max. The default value for this setting is 4.
You can check more of these manual tweaks at PCTipsBox.com here
6. Set Third Party Apps for Content Handling
By default Firefox tries to save or open some types of file extensions by itself. You can change the applications to handle those files. Like:
– Set PDF files to Save or open in addon installed by PDF reader in your system.
– Set “mailto” to use your favorite email client like Outlook or Thunderbird or you may use Gmail/Yahoo online web interface.
– Change “Web Feed” from Preview in Firefox to your favorite RSS reader. Like I’ve set to always open and automatically subscribe to Thunderbird.

7. Increase Cache Size
To make switching between different (opened) tabs faster, you can increase the cache (disk space for temporary files) size that Firefox use.
To do this, Go to Options -> Advanced -> Network, increase Offline Storage (size of the disk cache) to 150 MB.

By default the value is set to 50 MB, that is Max. 50 MB of offline files can be stored temporary when Firefox is running. You can increase the nu
mber to more than 150 MB if you feel that performance is still slow.


Best Generative AI Chatbot Comparison: ChatGPT vs Gemini vs Copilot vs Claude
Explore the pinnacle of conversational AI as we compare leading platforms: ChatGPC, Gemini, Copilot, and Claude for the title of...


Top 5 Disposable Email Generators for Secure Temporary Use
Discover the best disposable email generators for safe, temporary email solutions. Ideal for quick use without compromising privacy.


The Best Methods To Transfer Data From Android To iPhone
Switching from an Android phone to an iPhone can be an exciting but overwhelming experience, especially when you want to...


Get FREE US Virtual Bank Account Number To Receive Payments Online
Getting a virtual account number is the unique need of those freelancers and other online earners who work prolifically on...


Make Perfect Visual Identities On Mobile With Logo Maker App!
Are you amid those who are looking for a perfect logo creator? Be glad! Logo Maker App has heard you. You...