Desktop Tools
Wash Away the Spam Emails With MailWasher Email Filteration [FREE]
 It’s always a big task to manage your everyday emails and filtering the spams before you download them and you probably have to spend hours in sorting them out. But now its time to switch to the ultimate MailWasher.
Its a FREE spam filtering software which effectively stops email spams and is the easiest way to check and manage your emails before you download. It works with all email programs like Outlook, Outlook Express, Incredimail, Thunderbird, Windows Mail, GMail, Hotmail and every other.
It has an easy set up and you quickly gets to learn its management. It has got many benefits and features in it for you like its gives you an easy option of DELETE to clear all the unwanted emails and spams, a smart way to stop viruses enter your computer.
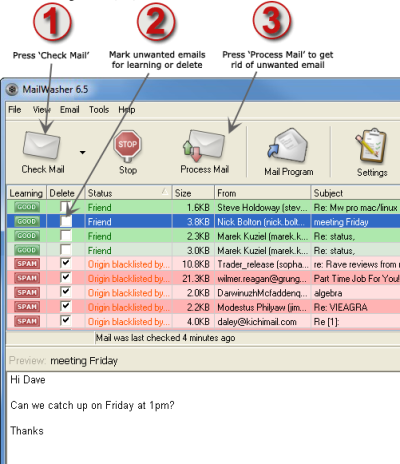
With MailWasher, you can:
– See the subject of the email you receives, the attachments enclosed with it making it much easy for you to decide which email to delete and which one to keep.
– PREVIEW the message in your emails before downloading them into your computer, this way you keep yourself away from downloading unwanted emails.
– Enjoy a wide range of ANTI-SPAM TOOLS, personal friends list and blacklist, customizable filters, external blacklists, bayesian spam filtering quickly learns to distinguish your spam and good email and email virus filtering.
– Add your friends email addresses to Mailwasher and they will be recognized in future. You can also hide the friends list from the screen to spot out the spams more easily.
Its effective filtering automatically spots the spams plus it also filters out the potential spammers of the customizable filters and external blacklisted. The recycle bin is there for you to restore your mails anytime you want.
A super simple program with extremely useful features and services. And good thing is, Mailwasher never expires and serves you for lifetime!
Desktop Tools
Smallest Antivirus to Automatically Remove Autorun.inf Virus from USB Flash Drives
Autorun.inf is not very harmful but still the most annoying virus of all which travels through flash drives. There’s a nifty tool designed specifically for this purpose – to remove Autorun.inf Virus from USB drive!
This virus automatically executes itself as soon as the infected flash drive is inserted into a system. When user double clicks the infected drive, autorun.inf with associated (hidden) .bat files infects all the partition of the system and autorun.inf is copied to all the drives.
Although this can be prevented through standard antivirus software but there’s a dedicated antivirus made specially to remove autorun viruses called Autorun Virus Remover.

Remove Autorun.inf Virus
Autorun Virus Remover provides protection against any malicious programs trying to attack via USB drive. When a USB device is inserted into your computer, Autorun Virus Remover will automatically scan it, block and delete autorun virus, trojans, and malicious code. Also, it can detect and remove USB virus such as autorun.inf virus in your computer.
Remove Autorun.inf Virus with Autorun Virus Remover can also remove the autorun virus due to which you can’t open your hard disk and USB drive (Pen drive, Memory card) by double clicking. Autorun Virus Remover USB antivirus software to permanently protect offline computer against any USB virus without the need for signature updates. This light and easy to use solution is compatible with all version of Windows and doesn’t slow down your computer at all.
Desktop Tools
Snappy: All in One Driver Installer For All Your System Drivers
Snappy system driver installer is a freeware for Windows which is an All in One Driver Installer and can be used as a complete solution to install all types of drivers on your system. There are two main sources which are supported by the program namely driver packs and local folders. The program is capable enough to pick the drivers automatically from the folder where you kept them and bring it to use at any given time.
The computers who have a weak or unreliable internet connection can avail the services of this program as it can install all the drivers without it. To start installing drivers on your computer, go to the updates option which can be found on the top and download the index file by checking on the option ‘Check only needed for this PC’ and then click on accept. This index file will add all the relevant information to the software. The program then works by checking for all the missing drivers and updates for the already-installed programs on the system.
You are also free to download all the driver packs, however, which is not recommended by the experts. You only need to do this if you need to create a completely portable version of a particular program on the computer which, by default, includes all the drivers. There is one thing to note that you will have to download nearly 9 GB of data in that case.
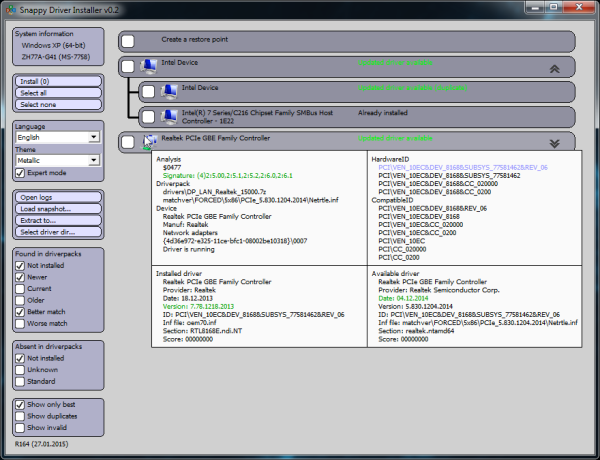
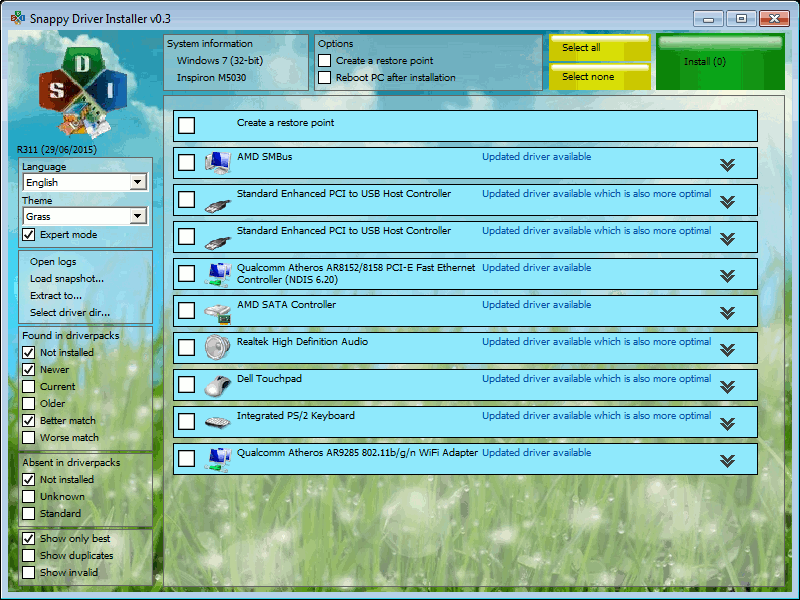
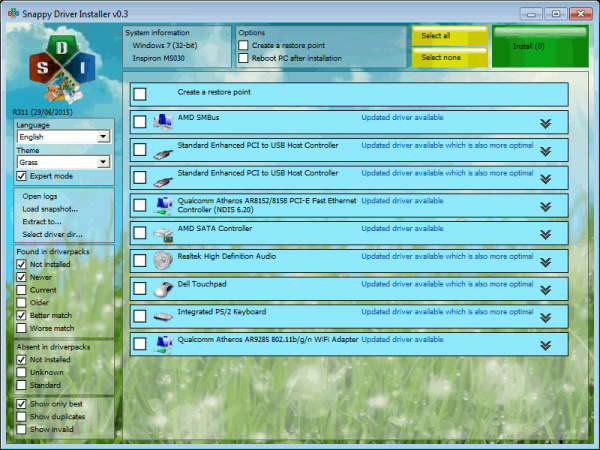
As soon as you are done downloading, the main interface of the program will show the updated driver information afterward. You can also enable the expert mode present on your left where you will be able to use filters to customize the selected option. You are also free to disable the updates which you think are, in no way, better than the ones already installed.
Before selecting the drivers which need to be updated, hover on each device to get information about each device’s already installed driver and the update the program wants to install. The information may consist of the update’s version, device’s manufacturer’s name, hardware IDs, etc. It is quite beneficial to give some time to these facts as there may be some updates which are not suitable for the device or are falsely identified. Once you are done with all these important steps, the Snappy Driver Installer will start downloading the selected driver updates for your system, installing afterward.
Desktop Tools
Easiest Way to Recover Deleted Photos and Text Messages From Phone For FREE
Recover deleted photos from phone easily with the world’s number one android file recovery software named Wondershare Dr.Fone. It is a tool which is used worldwide for recovering files and data from android tablets and phones. The tool is capable of retrieving audio files, Whatsapp messages, videos, call history, contacts, photos, text messages and a lot more that you lost accidentally or due to the ROM flashing or OS crash. The tool supports about 200 android devices and many android versions.
How To Recover Deleted Photos From Phone And Other Data
Dr. Fone is very beneficial in recovering files on android devices and can retrieve deleted text messages too. However, if the tool is not dealt properly, the software will not be able to recover all the files properly. Before beginning the process of recovery, the following tips should be considered to increase the success rate positively.
- First of all, if you find out that some of the files have gone missing on the phone or a list of data is deleted accidentally from the phone, stop using the device instantly. In android or other OS, the data is actually not blown away but is kept in the phone to be rewritten by some other files. For this particular reason, if the device is kept working on, that data gets overwritten by the recent changes in the phone and ultimately, disappears forever.
- Secondly, look for a computer as soon as possible and start the process of recovery. Don’t forget, the sooner it is, the better it is. Download the recovery software by Wondershare i.e. Dr. Fone for android. For further information, follow the following downloading process.
How To Download
There are more than one way to download Wondershare on your phone. You can either go to the product page to find the app link or simply click the download option on the top of the page to get Dr.Fone on your phone. Once downloaded, your phone will offer an installation package. The download button is also featured in the bottom of the page.
How To Install
Once you have downloaded, search for the installation package on your system. Double tap on the .exe file to run the setup and click on the install option to start the recovery process. The installation process will take approximately a few minutes. Once there, the Start Now option should be clicked to launch the software.
Smallest Antivirus to Automatically Remove Autorun.inf Virus from USB Flash Drives
Autorun.inf is not very harmful but still the most annoying virus of all which travels through flash drives. There’s a...


Get FREE US Virtual Bank Account Number To Receive Payments Online
Getting a virtual account number is the unique need of those freelancers and other online earners who work prolifically on...


Make Perfect Visual Identities On Mobile With Logo Maker App!
Are you amid those who are looking for a perfect logo creator? Be glad! Logo Maker App has heard you. You...


How To Fix 502 Bad Gateway Error in WordPress
We all have encountered the very frustrating 502 bad gateway error on our WordPress website many times. As speaking about...


Fastest Ways To Download Android APK files To PC
Android apps come compiled in an installer package known as “APK”. It is actually the extension of the package (.apk)....
-
 Desktop Tools12 years ago
5 Best FREE LAN/WiFi Chat & File Sharing Software
-
 Featured12 years ago
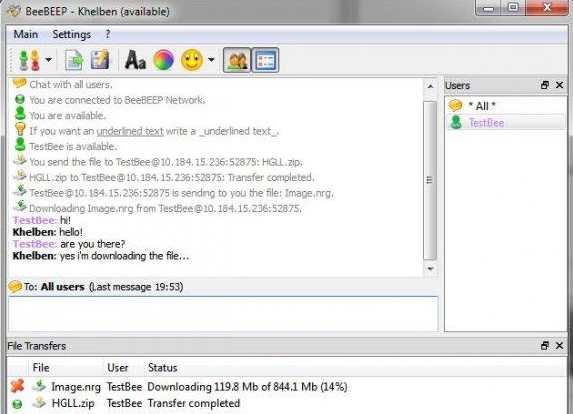
4 Best Ways To Transfer Files Over LAN or Wifi Network
-
 Desktop Tools12 years ago
5 Free Software to Make Unattended/Silent Installers
-
 Desktop Tools9 years ago
15 Best Android PC Suite Software for Windows of 2015
-
 Offers12 years ago
Full Version Angry Birds Space Activation Key for PC [Giveaway]
-
 Desktop Tools12 years ago
10 Best PC Suite For Android Smartphones
-
 Desktop Tools12 years ago
5 Best Sites To Download iOS (iPod, iPhone, iPad) Games for FREE
-
 Desktop Tools12 years ago
5 Top Free Software to Watermark Your Images