Tips
13 Unnecessary Vista Feautures to Disable.
Thirteen unnecessary Vista features to disable.
More than any version of Windows ever — Vista has most unnecessary options included. All of features indirectly slowing down system’s performance, but you never Know.
You can regain some PC performance by removing unneeded features.
I’ve identified some of those Vista features that you can turn off right now. Some are shiny baubles that slow down graphics performance, while others are optional utilities that hog memory when they shouldn’t. A few can actually be quite useful, though they play a major role in bogging down your PC.
Should you really turn off all of the following features ?? That depends on your computer usage, your work habits, and your tastes. (I’ve turned off only seven and a half on my PC, because while none of these features are required for Vista to function, some are still kind of nice and my computer is fast enough to handle them.)
Just to be on the safe side, make sure to create a restore point before you turn any of the items off. That way you can quickly return your machine to its present state should you decide that you don’t like the change.
To make a restore point, click Start, type sysdm.cpl, and press Enter. Choose System Protection, Create, and then follow the prompts.
OK, Here we go…
1. Sidebar
You pay a heavy performance price for the analog clock, thumbnail slide-show viewer, and Microsoft-centric RSS news feed that dock in the Windows Sidebar. Turning the whole thing off gives you a big speed boost, especially at boot time.
To remove the Sidebar, right-click anywhere on the Sidebar and select Close Sidebar. Uncheck Start Sidebar when Windows starts, and then click OK.
2. Aero
Microsoft put a lot of Vista’s visual enhancements under one technological and marketing umbrella: Aero. Among those features are the thumbnails of your windows that appear when you hover the mouse pointer over the taskbar, as well as the Flip 3D view you get by pressing Windows-Tab. Aero adds a little practicality and a lot of attraction to the Vista user interface, and personally, I like it.
If your PC is underpowered or overloaded, however, Aero may be more trouble than it’s worth. To turn it off, right-click the Windows desktop and select Personalize, Window Color and Appearance. In the resulting “Window Color and Appearance” dialog box, click Open classic appearance properties for more color options (if you don’t see the option, that means Aero is already turned off). Select Windows Vista Basic and click OK.
3. Assorted Interface “Beautification” Options
You can save some additional clock cycles by turning off all or some of Vista’s pretty interface options, not all of which are directly connected to Aero.
To see the options, click Start, right-click Computer, and select Properties. Click the Advanced System Properties link, the Advanced tab, and then the Settings button inside the Performance box.
You can uncheck all of the listed options by selecting Adjust for best performance, or you can simply uncheck the ones you don’t care for. I unchecked Fade or slide menus into view, Fade or slide ToolTips into view, Show shadows under menus, and Slide open combo boxes. The rest I left on.
4. Remote Assistance
Don’t worry about turning this item off if you run Vista Home (Basic or Premium). You don’t have it. If you run Vista Business or Ultimate, though, you can use Remote Assistance to control one PC from another–a useful tool if you regularly provide tech support for a relative living far away.
On the other hand, if you’re not providing long-distance support, or if you prefer a third-party remote-control program, Remote Assistance is just a waste of resources. To get rid of it, click Start, right-click Computer, and select Properties. Click Remote Settings. Uncheck Allow Remote Assistance connections to this computer.
5. Internet Printing Client
Do you ever print documents over the Internet? Neither do I. Chances are, you won’t miss out on anything by disabling Vista’s Internet Printing Client.
Open the “Programs and Features” control panel and click the Turn Windows features on or off link on the left; you’ll get the Windows Features dialog box. Expand the Print Services section and uncheck Internet Printing Client.
Click OK at this point, and then wait for the system to ask to reboot.
6. Windows Meeting Space
I like Windows’ built-in peer-to-peer collaboration program, Meeting Space, which lets you share files across a network while editing them with a remote colleague. But I don’t have any use for it in my daily life, and neither do most of the people I know.
So I shut Windows Meeting Space off. You can, too. Simply uncheck Windows Meeting Space while you’re in the Windows Features dialog box, as explained in 5th feature.
7. Windows Ultimate Extras
One of the best things you can do exclusively in Vista Ultimate Edition is turn off the really pointless features that are found exclusively in Vista Ultimate Edition. I refer, of course, to Ultimate Extras, a set of downloadable add-ons available only to Ultimate users.
If you do own Ultimate, go to Windows Update (Start, All Programs, Windows Update), click View available updates, and check out all the worthless stuff Microsoft has made available exclusively to people who paid through the nose for the most bloated version of Vista.
You can turn Windows Ultimate Extras off in the Windows Features control panel by clicking Turn Windows features on or off to open the Windows Features dialog box, and then unchecking Windows Ultimate Extras.
8. Tablet PC Stuff
I own a tablet PC, and I love Vista’s tablet-oriented features — especially the Input Panel for writing with the stylus. But if you don’t have a tablet, these features are useless to you.
Turning off Vista’s tablet features is a two-step process: Start in the Windows Features dialog box. Once there, simply uncheck Tablet PC Optional Components.
or
You can disable the this from the Services window, which you open by clicking Start, typing services, and pressing Enter. Find and double-click Tablet PC Input Services. In the “Startup type” drop-down menu, select Disabled, and then click OK.
9. ReadyBoost
If you’re not using this much-hyped Vista feature–which supposedly speeds up Vista by caching memory to a flash drive — it’s actually slowing your system down a tiny bit. (And if you are using ReadyBoost, it’s probably still
a drag on your PC.
But if you still use it. Then it’s upto you to disable or not.
You turn off ReadyBoost in Services. If you aren’t already there, click Start, type services, and press Enter. Find and double-click ReadyBoost. In the “Startup type” drop-down menu, select Disabled, and then click OK.
10. Search Indexing
This one is a real trade-off. Turning off Vista’s indexing will slow searches to a crawl — I’m talking minutes, not seconds. But ditching this convenient feature could very likely speed up your general PC use significantly.
In other words, turning off indexing will help your PC’s performance only if you seldom search by file content, or if you use a third-party search tool such as Google Desktop (in which case you probably have two indexing routines running at the same time, which is an even bigger waste).
To turn off indexing clicking Start, typing services, and pressing Enter. Find and double-click Windows Search. In the “Startup type” drop-down menu, select Disabled, and then click OK.
11. Offline Files
If you work on files stored on a server somewhere, and you can’t depend on that server always being available, Vista Business and Ultimate’s Offline Files feature makes your life easier by copying the files to your hard drive and keeping them synced.
Of course, that sort of thing isn’t for everybody, which is probably why Microsoft didn’t include Offline Files in the Home editions of Vista. But if you have Business or Ultimate and still don’t need Offline Files.
Turn it off by clicking Start, typing services, and pressing Enter. Find and double-click Offline Files. In the “Startup type” drop-down menu, select Disabled, and then click OK.
12. Windows Error Reporting Service
Every time Windows experiences an error — either with its own processes or with a third-party program — it offers to report the problem to Microsoft. In theory, doing so can help the company locate problems with its OS (and heaven knows that would be a good thing). But more than likely, your report will either go unresolved or just end up in a big pile of other people’s reports on the same problem. Either way, you’re wasting your system’s precious resources on a feature that isn’t doing you any good.
To disable this unhelpful service, open the Services window: Click Start, type services, and press Enter. Find and double-click Windows Error Reporting Service. In the “Startup type” drop-down menu, select Disabled, and then click OK.
12. UAC: (User Account Control)
One of Windows Vista’s most controversial new features is User Account Control (UAC), which attempts to protect your system from malware by forcing you to authorize certain system-altering actions by clicking through a dialog box from time to time. To some people, this feature is an unwanted annoyance that must be eliminated. Other users appreciate this added security.
If you would like to turn off UAC, then navigate to:
- Control Panel -> User Accounts ->
- Turn User Account Control On or Off.
- Now decide if you want to untick the box which say: ‘Use User Account Control (UAC) to help protect your computer’.
- Now you have disabled the User Account Control.
But I’ll still remind if you want this extra security feature of Clicking “Continue” every time you perform an administrative task, you can leave this enabled.
Tips
Lost Data From iPhone? Reasons and Steps For Recovery [Infographic]

Well, if you have lost data from iPhone, it is highly likely that you may become a victim of this data loss from your iPhone for some reasons which you have not come across as of yet. And since your mobile serves to be the hub of most of your precious data, you would definitely not want to encounter anything like this, right?
Recommended Read: How To Keep Data Safe on Smartphones – Best Security Measures
Data which is a digital form of information stored on your iPhone is always vulnerable to losses. Whether they are the highly important WhatsApp messages, videos, and photos that carry amazing memories, highly sensitive contacts or anything else that is stored in your mobile; you are always at a risk of losing all of it in just one go!
Related Article: How To Recover Deleted Whatsapp Media Files From Phone
Causes for Data Loss from iPhone
There is not one or two but many causes that lead to the lost data from iPhone. To provide you with a better picture, we have divided the causes in an order which accounts the most to the least. So, let’s take a look at the list:
Accidental Deletion
Accidental deletion accounts for around 35% of all the losses that happen with the users of iPhone. While some deletion happens in a haste and other unknowingly; be it any form, it is the cause which tops the list of all the losses!
Water Damage
We are sure that you must have come across this term several times. Unsurprisingly, it is the second leading cause which accounts for 15% of the data loss among the iPhone users that abandon them with their precious data.
Failed iOS Upgrade or Jailbreak
Standing par to par with Water damage, the failed attempt of jailbreaking or up gradation of iOS also leads to the lost data from iPhone and accounts for 15% among the iPhone users.
Restoring to Factory Setting
It accounts for around 10% of the total losses because we most cases forget to back up the data before pressing that button!
Virus Attack
With only accounting for 5% of total losses, the Virus attack is the least leading factor of the losses of data from your iPhone.
You can find further details and stats by looking at the following infographic which contains absolutely everything which you would want to know.
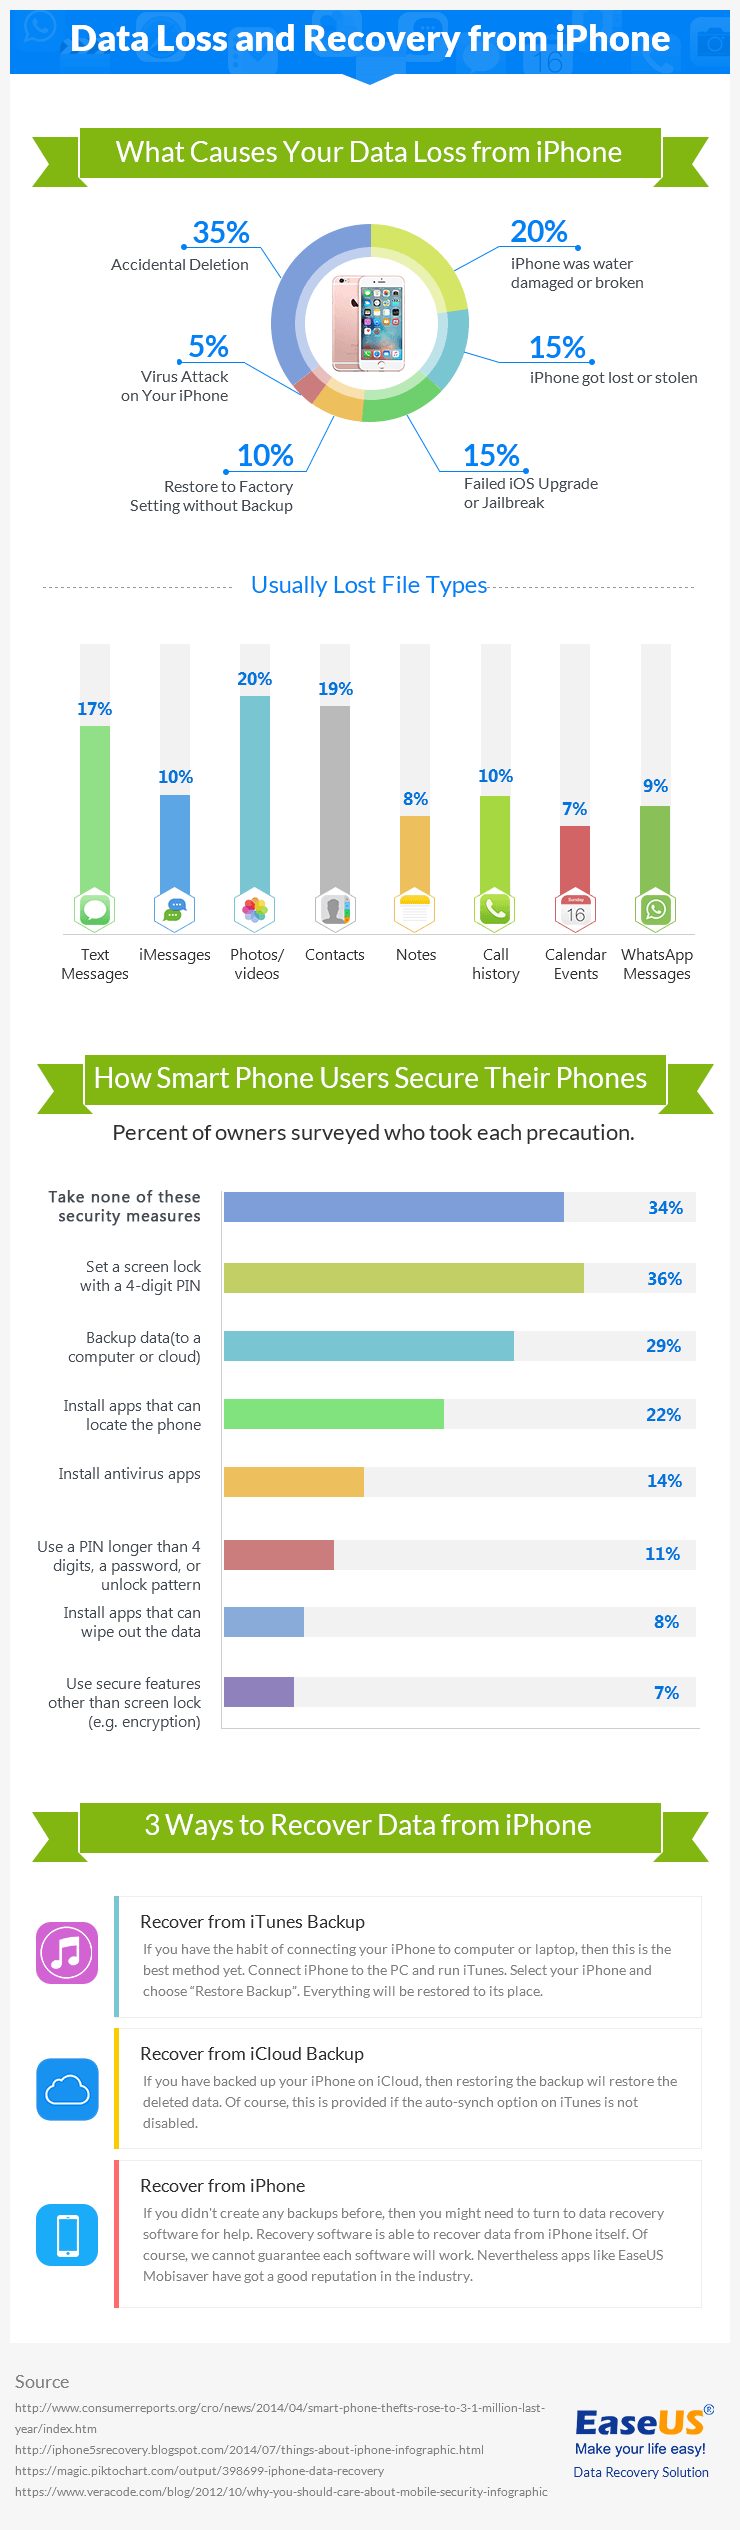
Source: http://www.easeus.com/
Guides
How to Make Sure the Article You Have is plagiarism free?

The act of copying someone’s text, content or article and publishing it with the own name is called plagiarism. It’s easy to find information almost for any article through the internet, but it’s not easy to add that information into an article without falling into the plagiarism. Avoiding plagiarism is easy with the help of some simple tricks. Follow some easy steps while writing your article to ensure that your content is free of plagiarism. In this article, we will tell you how to check plagiarism free article and to avoid plagiarism in your article.
Steps To Avoid Plagiarism
Following are the steps to avoid plagiarism:
Take Your Time
Plagiarism mostly happens with an intimidating deadline and when you need to get the next task finished quickly. Hence, the first step should be to make sure that you have plenty of time to the writing process. Make sure you have enough time for double checking and editing the content so that you don’t have anything left in there that you didn’t write yourself.
Keep Track Of Sources
If you use someone else information, mention it below. Better yet, provide a link to them while writing or place the link into the draft. That way you will stay aware of what’s your own written and what have been taken from other people.
Read more than one source
In most cases, the danger of plagiarism also shows up when you limit your research. If your article is completely based on single content, you easily run the danger of sticking to its original formatting, phrasing, and other identifiable features. So, do broad research and read or learn through as many sources as you can.
Use Quotes
If you simply want to lift the text exact from your resource materials, you should quote other peoples’ text on your blog post and provide a link to the online resource or the site you took it from.
Attribute
In this case, the same goes if you plan to include a point or an original idea from the alternative source. Even if you’re expressing it in your words, make sure to place a link. This not only frees you from the plagiarism but it’s also a better option regarding SEO.
Re-Paraphrase
When spreading information that does need to be transferred to everyone (because it is collective knowledge), make sure to re-paraphrase or rewrite it. Must keep that in mind publishing the content in same language or phrasing will only get you punished for plagiarism.
Check
Finally, probably it is the best way to confirm your article is plagiarism free is to check. That does not mean, just to edit your content until its unique completely, but also, run it through a plagiarism checkers mentioned in the list below. These checkers will compare your content to available web sources and will notify you whether your content is completely free from plagiarism or not.
How To Check Plagiarism Free Article With Following Tools
if you have are searching for, how to check plagiarism free article? Use following tools to re-check your content before publishing it. It may take few minutes but will save you from lots of headache concerning plagiarism.
1. Plagiarism Checker By Small SEO Tools
It is a free online plagiarism tool that will run your article or blog through Google and other search engines, phrase by phrase, and provide % score on its uniqueness. It takes some time to perform the check for longer content, but the sweep seems to be detailed. It can perform maximum of 1000 words per check
2. WorldEssays Plagiarism Checker
It is another free plagiarism checker. An unregistered visitor can sweep up to five times per month. It works very well and can successfully list all sources of the plagiarized content available in the article.
3. Grammarly
Grammarly is a paid tool which apparently runs your content through 8 billion websites. Grammarly plans start from $11.66/month on a yearly contract and can extend up to $29.95/month. It is mostly used by professionals who need to check a lot of text every day.
4. Copyscape
A plagiarism tool that will not only help you find a copied content on the web but their premium version also enable the user to check their work for originality and uniqueness.
5. Duplichecker
Duplichecker is also a free online content checker, with no maximum words/search. Unregistered users can only be able to search one time. Registered users can unlimited searches, and it is completely costless. This checker enables two options ‘Copy/Paste’ and online ‘File Uploader’.
Conclusion
Be sure to edit your article carefully and check for plagiarism before publishing. The steps above are essential for content writing. Using plagiarism checker services is a considerable way to assess your anti-plagiarism skills and paraphrasing.
SEO
SEO Techniques That No More Work In The Year 2016

SEO (Search Engine Optimization) provides great help to improve traffic on websites by getting it to a top-rank placement in (SERP) Search Engine Results Page such as Bing, Google, Yahoo, and many others. Some of the strategists may say that SEO is dead, which is not true at all. As the matter of fact, SEO has died for the people who have failed to adapt to the dynamic rules. These rules change almost every month and increase the requirements of tools, knowledge, skills and patience. Below are the SEO techniques that no more work in the year 2016
SEO Techniques That No More Work in The Year 2016
SEO techniques that have worked great until yesterday might not work at all tomorrow. Indeed, with the growing rate of upgrades by Google it doesn’t matter if your website traffic graph was at the top yesterday, you may see it going down tomorrow.
It is important to keep in mind, that we should have a look at the following 7 SEO techniques that no more work in the year 2016. Indeed, they were the best methods five years back, but now they do nothing more than harming your site. They are:
Focusing On Quantity Of Links Over Quality
If you’re still using large numbers of links to boost your website’s ranking, it’s the time you should stop doing it and focus on the quality of links. Because it is more important to provide the quality links than stuffing loads of links. After all, Google has said that the websites can have as many links as they are in a reasonable amount.
Putting keywords in Meta description
Almost a decade back, it was a good technique to put keywords in the meta description, and it also used to get users’ results. But after 2009 (per Google’s new rules) the keywords are no longer used as an SEO ranking factor. But this doesn’t mean that you should ignore the metadata descriptions. You should provide the metadata descriptions by writing them with keeping the audience in mind so that they can understand what the website is about.
You should provide the metadata descriptions by writing them with keeping the audience in mind so that they can understand what the website is about.
Overdoing keywords – high keyword density
Many strategists may say that over stuffing the keywords in web content, meta descriptions, titles, etc. is useful, but nowadays this is not the case. While Google has not given any specification about keyword density over stuffing keywords in your web content and a large number of times that a keyword appears in metadata, webpage, descriptions, and titles, in particular, it can harm the SEO rankings of your site.
Duplicating content
Google has provided a detailed notice about the Duplication of the content regarding SEO. They agree with the idea of many websites that requires the duplicate content, but this only includes printer versions of web pages and the forums that provide the content aimed at saleable items and mobile devices that are linked via URLs. If the mentioned content is not your idea of duplicating a content for your web, then you will be charged for manipulating the search results.
If the mentioned content is not your idea of duplicating content for your web, then you will be charged for manipulating the search results.
Do Not Waste Time On Adding Images To Your Content
It is also one the SEO techniques that no more work in the year 2016. For a time being, it was acceptable to oversight the images and hope for a good ranking without using any alt text image. Eliminating the images on your articles or your sites will make you miss a tool which can be important. Search engines need to find any images on websites. Therefore, it is important to provide alt-text describing images for the Google to know what it returns.
A Better Ranking for More Traffic
It is a misconception that high ranking helps to attract more traffic to your site. Appearing on the top list is one thing, but attracting visitors is completely a different story. There are couple of reasons behind this misconception which states as:
- Your content strategy is not appropriate.
- Your meta descriptions are not attractive.
Provide More Pages to Get More Traffic
Some SEO experts may tell you to have more pages to get more traffic on your site. Likewise, link building, if content writing is done for the only purpose of filling the number of pages, it won’t work. It is important to focus more on the quality rather than quantity. Only good quality content can help you to increase your site ranking. But if your content is no good, all those pages you have created are just a waste of time.
Conclusion
These outdated practices were used to be productive years ago. In modern times, it is crucial for SEO strategists to understand and adapt the latest methods very quickly. The best techniques to go with SEO is to keep yourself updated with the modern trends and implement them to get results and leave those SEO techniques that no more work in the year 2016.
Smallest Antivirus to Automatically Remove Autorun.inf Virus from USB Flash Drives
Autorun.inf is not very harmful but still the most annoying virus of all which travels through flash drives. There’s a...


Get FREE US Virtual Bank Account Number To Receive Payments Online
Getting a virtual account number is the unique need of those freelancers and other online earners who work prolifically on...


Make Perfect Visual Identities On Mobile With Logo Maker App!
Are you amid those who are looking for a perfect logo creator? Be glad! Logo Maker App has heard you. You...

How To Fix 502 Bad Gateway Error in WordPress
We all have encountered the very frustrating 502 bad gateway error on our WordPress website many times. As speaking about...


Fastest Ways To Download Android APK files To PC
Android apps come compiled in an installer package known as “APK”. It is actually the extension of the package (.apk)....
-
 Desktop Tools12 years ago
5 Best FREE LAN/WiFi Chat & File Sharing Software
-
 Featured12 years ago
4 Best Ways To Transfer Files Over LAN or Wifi Network
-
 Desktop Tools12 years ago
5 Free Software to Make Unattended/Silent Installers
-
 Desktop Tools8 years ago
15 Best Android PC Suite Software for Windows of 2015
-
 Offers12 years ago
Full Version Angry Birds Space Activation Key for PC [Giveaway]
-
 Desktop Tools12 years ago
10 Best PC Suite For Android Smartphones
-
 Desktop Tools12 years ago
5 Best Sites To Download iOS (iPod, iPhone, iPad) Games for FREE
-
 Desktop Tools12 years ago
5 Top Free Software to Watermark Your Images